
Learning To Crawl (For DockerHub Enthusiasts, Not Toddlers) - Docker Container Images (3/4)
This post is the third part of a series on our recent adventures into DockerHub. Before you read it, you are advised to look at the part other parts of this series:
- "I don't need no zero-dayz" - Docker Container Images (1/4)
- Layer Cake: How Docker Handles Filesystem Access - Docker Container Images (2/4)
- What Does This Key Open? - Docker Container Images (4/4)
-
Those who have been following this series on our processing of DockerHub will be all ready for this, the third post, focused on system design. If you're a relative newcomer, though, or haven't been following the series, don't worry - we've got you covered with a quick recap!
As I stated in the previous post, we have a very simple mission here at watchTowr - to help our clients understand how they could be compromised today. After noting how frequently we discover potential compromises due to secrets lurking inside publicly-available Docker images, we decided to carry out a more thorough study to assess the scale of this kind of credential leakage.
We love doing things "at scale" here at watchTowr, and so we didn't just try to docker pull a few images and grep -ir password . - we did things in a much larger manner. This means we can make statistically meaningful generalisations from our results. In this post, we're going to share the overall 'system design' that we used to acquire, process, and examine files, ultimately finding oodles of secrets - everything from passwords to certificates and everything in between.
General Design
As I allude to above, it is our intention to fetch a statistically significant portion of the DockerHub dataset. To do this, a single computer isn't going to be enough - we are going to need to use multiple "fetch-worker" nodes. We used Amazon's EC2 service for this, to allow for easier scaling.
Our approach is to use a MySQL database for storing file metadata (such as filesystem path, filename, size, and a sha256 hash of the contents). The files themselves, once extracted from a Docker filesystem, are stored in a flat filesystem directory. We chose to use AWS' 'Elastic File System' for this, which is based on NFS. Note that we don't store the Docker image files themselves - we download them, extract the files they contain, and discard them.
Once files - referred to as 'artifacts' going forward - have their metadata and contents ingested into the system, separate instances (which we termed "scan-workers") search them for interesting information, such as keys and access tokens, via a slightly-modified version of the popular GitLeaks software. We'll go into more detail on the "scan" side of the system in a subsequent blog post.
Finally, we use the Zabbix monitoring software to graph metrics, and (combined with the excellent py-spy tool) monitor and troubleshoot performance issues.
Problem 1: Finding Repositories
One aspect of the project we expected to be very simple is the mere act of locating repository names in order to fetch them. Taking a look at the DockerHub search page, we can see a number of web services which speak json, and so we scurried away to write tools to consume this data.
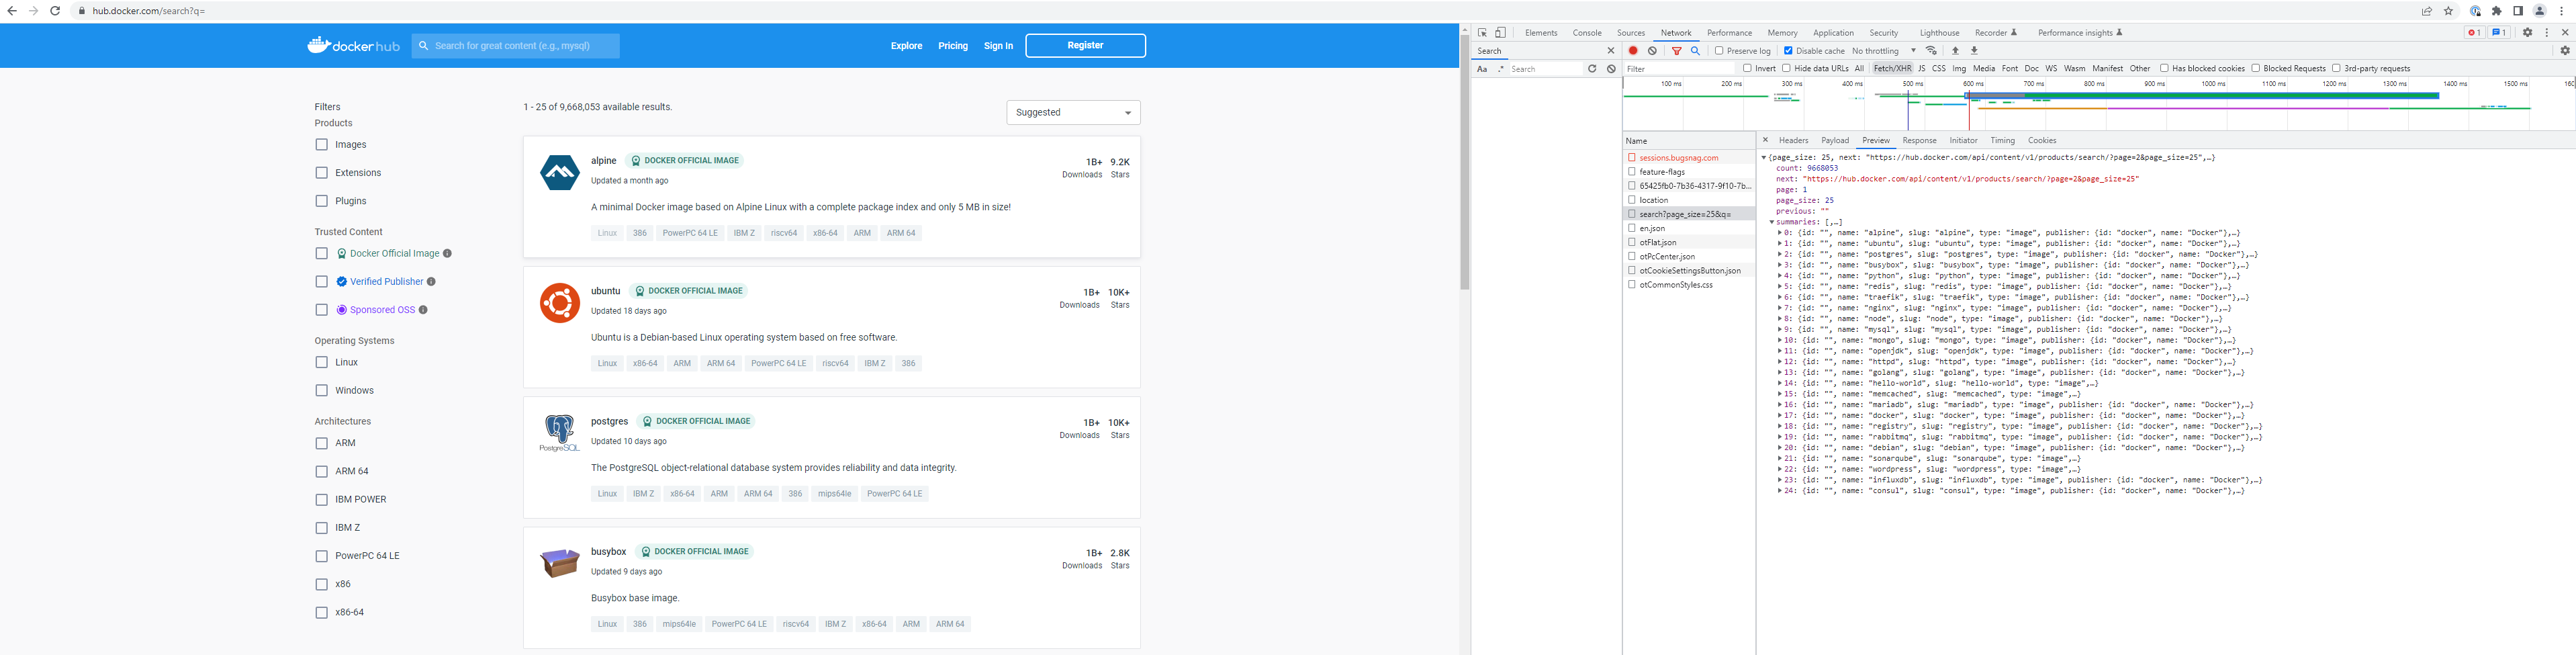
However, our triumph was short-lived, since this service only returned the first 2,500 search results, yielding only a HTTP 400 response for anything beyond this range. While there are some ways to work around this - applying search filters, or a dictionary attack on search keywords - there is actually a much better way.
Regular readers of the blog will remember a previous post in which we sing the praises of the Common Crawl dataset. The dataset, which essentially an open-source crawl of the web, can come to our rescue here. Rather than attempt to spider the DockerHub page ourselves, why not query the Common Crawl for all pages in the hub.docker.com domain? While there'll be a lot of false positives, they're easily discarded, and the result will be a lot URLs containing information about repositories or usernames (from which it is easy to fetch a list of owned repositories).
We'll do this in Athena:
select count(*)
FROM "ccindex"."ccindex"
WHERE crawl like 'CC-MAIN-2022-33'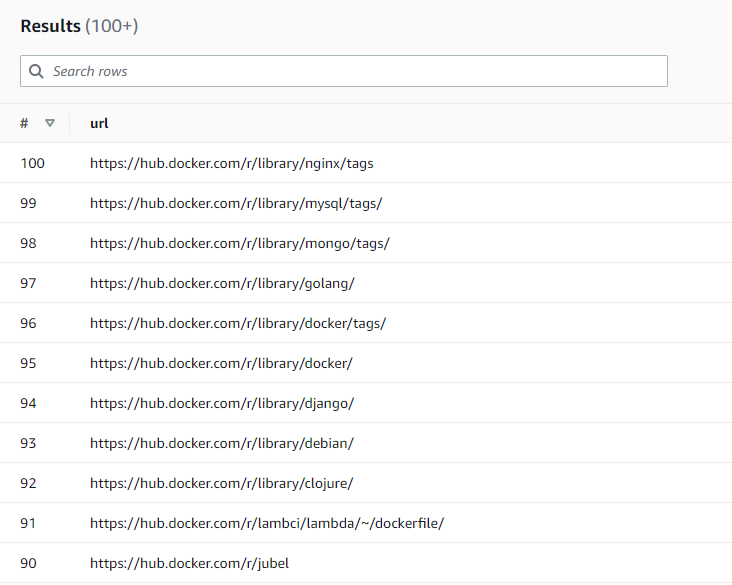
and url_host_name = 'hub.docker.com'This simple query yields slightly over 274,000 results. While not all of which are useful to us, the majority are, as this file yields information about over 20,000 individual repositories.
Fantastic! Now we're ready to spider. Right? Well, almost.
Problem 2: Rate Limiting
Unfortunately for us, the DockerHub API will aggressively rate-limit our requests, responding with a HTTP 429 once we exceed some invisible quota. While our first instinct is to register, and pay for this service, it seems like bulk access to this API is not a service that DockerHub offer, and so we must turn to more inventive methods.
While we initially run a number of SOCKS proxy servers, we found they became rate-limited very quickly, and so we designed a system whereby each proxy (an EC2 'mini' instance) is used only until rate-limiting begins. As soon as we see a HTTP 429, we destroy the proxy instance and build a fresh one.
Finally, we're ready to spider.
Iterating And Claiming Layer(z)
Owing to the knowledge of Docker layers we built up in the previous post, we can fetch in a fairly intelligent manner. First, each "fetch-worker" will iterate the list of valid repositories, and find the most recently-pushed tag for each. This is a design decision intended to keep the dataset representative of the wider DockerHub contents; while it means we may miss secrets only stored in certain tags, it has the advantage that we don't discover revoked secrets in obsolete repository versions.
For each tag, we'll then enumerate layers, inserting them into the database.
Once this is complete, we can begin to fetch the layer itself. We must be mindful not to duplicate work, and to this end, a fetch-worker node will first 'claim' each layer by adding to the docker_layers_in_progress table on the centralised database, which uses a unique key to ensure that each layer can only be allocated to a single node. This approach (while slightly inefficient) allows us to rapidly scale worker nodes.
Once a node has claimed a layer, it can simply fetch it via HTTP. If the layer is very large, it will be saved to disk, otherwise, the layer will be held in memory. Either way, the data is decompressed, and the resulting tar file iterated. Each entry in the tar file results in at least one insertion into the database. For regular files, the file is also copied to the 'flat' store, an NFS-mounted file share.
Pulling An Image
Our first step is to list the tags present for a given repository image (identified by owner and name). This is easily done by requesting an endpoint from the v2 API anonymously, with a simple GET.
curl "https://hub.docker.com/v2/repositories/library/ubuntu/tags"The results are plentiful.
 {
  "count": 517,
  "next": "https://hub.docker.com/v2/repositories/library/ubuntu/tags?page=2",
  "previous": null,
  "results": [
    {
      "creator": 7,
      "id": 2343,
      "images": [
        {
          "architecture": "amd64",
          "features": "",
          "variant": null,
          "digest": "sha256:2d7ecc9c5e08953d586a6e50c29b91479a48f69ac1ba1f9dc0420d18a728dfc5",
          "os": "linux",
          "os_features": "",
          "os_version": null,
          "size": 30426706,
          "status": "active",
          "last_pulled": "2022-09-24T12:06:27.353126Z",
          "last_pushed": "2022-09-02T00:04:28.778974Z"
        },
   <snip>
As you can see, all the fields we need are here - the architecture and the OS, which we filter on, and the date the tag was last pushed. Great.
The next step is to identify the layers involved, and fetch them. This we dealt with in a previous post, so I won't go into detail, but suffice to say we must authenticate (anonymously) and then fetch the tag's manifest, which contains hashes of the constituent layers. I'll show examples using curl, for ease of demonstration, but the actual code to do this is Python.
$ curl  "https://auth.docker.io/token?service=registry.docker.io&scope=repository:library/ubuntu:pull"
{"token":"eyJhbGci<snip>gDHzIqA","access_token":"eyJhbGci<snip>gDHzIqA","expires_in":300,"issued_at":"2022-09-22T14:08:55.923752639Z"}

$ curl --header "Authorization: Bearer eyJhbGci<snip>gDHzIqA" "https://registry-1.docker.io/v2/library/ubuntu/manifests/xenial"
Our result looks something akin to this:
{
   "schemaVersion": 1,
   "name": "library/ubuntu",
   "tag": "xenial",
   "architecture": "amd64",
   "fsLayers": [
      {
         "blobSum": "sha256:a3ed95caeb02ffe68cdd9fd84406680ae93d633cb16422d00e8a7c22955b46d4"
      },
      {
         "blobSum": "sha256:fb15d46c38dcd1ea0b1990006c3366ecd10c79d374f341687eb2cb23a2c8672e"
      },
      {
         "blobSum": "sha256:da8ef40b9ecabc2679fe2419957220c0272a965c5cf7e0269fa1aeeb8c56f2e1"
      },
      {
         "blobSum": "sha256:b51569e7c50720acf6860327847fe342a1afbe148d24c529fb81df105e3eed01"
      },
      {
         "blobSum": "sha256:58690f9b18fca6469a14da4e212c96849469f9b1be6661d2342a4bf01774aa50"
      }
   ]
   <snip>
}
Finally, we can fetch the resources by their hash.
$ curl --location --header "Authorization: Bearer eyJhbGci<snip>gDHzIqA" https://registry-1.docker.io/v2/library/ubuntu/blobs/sha256:fb15d46c38dcd1ea0b1990006c3366ecd10c79d374f341687eb2cb23a2c8672eIt's worth noting at this point that there appears to be more than one version of this schema in active use - do check the schemaVersion tag and handle all versions!
I was also somewhat surprised to find that fetching certain layers from DockerHub will yield a corrupted archive, even when pulled using the official Docker client. I was under the impression that DockerHub used fancy locking semantics to ensure atomicity, but perhaps certain repositories were uploaded before this feature was rolled out. Also of note is the presence of zero-byte layers, which we must handle.
With this architecture, however, we are able to ingest a large amount of data and scale efficiently. We've solved the problems that stood in our way, and we're now ready to analyse all that data, which is the topic of the next post in the series!
Performance
While we deliberately chose not to spend a large amount of time optimising performance, we can share some interesting datapoints.
The database (MySQL on a t2.2xlarge instance) itself performed adequately, although our technique for allocating scan nodes added a lot of latency. It is suggested that any follow-up research replace this with some kind of scalable queuing system. While we won't go into detail on the topic of MySQL, as database tuning is an art in itself, we will share the size of the database itself - around 200GB (including performance and statistical data logged by Zabbix).
One major bottleneck was the 'flat' data storage shared between nodes. Early on, we made the design decision to store files in a 'flat' structure, with each simply named according to its hash. While typical filesystems usually scale badly beyond around a million files, our experience in the past with large (single-digit millions) files in this kind of structure has been adequate, showing that everything but listing the file contents (which we do not need to do) is performant, given reasonable hardware and an ext4 filesystem.
Initially, we tried to use S3 for storage of objects, but found that the overhead of a full HTTP API call for each file we examine was significant, and so we moved to Amazon's Elastic File System.
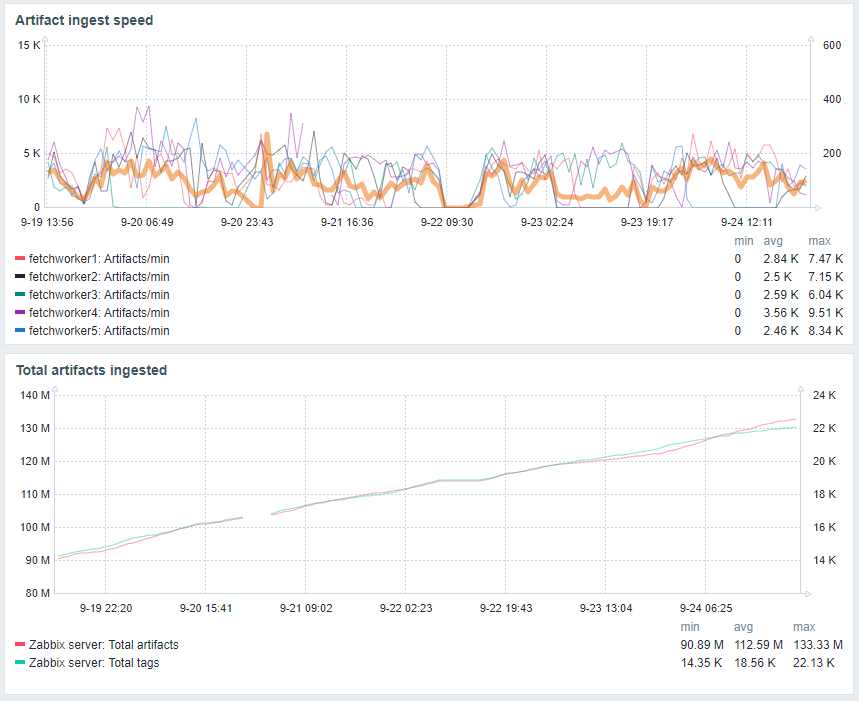
As you can see in the blow graph, most of the IO that we generated during normal ingest was in metadata - a sure sign of inefficiency.

At the end of the project, we also attempted to transfer the amassed files to a physical disk for long-term archival, since storing data in EFS is chargeable. However, we found that many tools which we've used previously with filesets in the single-digit-millions size became unusable, even when we were patient. For example, mounting the NFS volume and attempting to rsync the contents would result in hung sessions and no files. When we came up with a solution, we observed around 60% of IOPS were for object metadata, even though we were solely fetching objects by name, and not enumerating them. Clearly, Amazon's EFS is having some difficulty adapting to our unusual workload (although I hasten to add that it is still usable, a feat of engineering in itself).
These two factor combine and make it obvious that we are at (or beyond) the limits of a flat filesystem. For any who which to extend or replicate the research, we would suggest either using either a directory structure (perhaps something simple, based on the file hash) or a proper 'archival' file format such as the WARC archives that the Common Crawl project uses. This would necessitate writing some code to properly synchronise and ingest objects transferred from worker nodes.
Everyone Hates Regex
Perhaps surprisingly, the overhead of the Python runtime itself is quite small. One notable performance optimisation we did find necessary, however, is to shell out to the underlying OS's gz command in order to decompress files, which we observed to be roughly twice the speed of Python's implementation.
One other area that Python did show weakness is that of matching regular expressions. Initially, we matched each filename before scanning each file, so that we could skip files we weren't interested in. However, this was unusably slow - we quickly found that it was much faster to simply scan each file, and only check if the result was interesting via a filename cehck after doing so. This cut down the amount of regex queries significantly. Perhaps a subsequent project could use a compiled language such as golang instead of Python.
It should also be noted that the design of the regular expressions themselves is important (perhaps no surprise to those that regularly write regular expressions in high-traffic environments). We write some test code to benchmark our regular expressions and quickly found two which took around ten times longer to process than others - I had inadvertently left them unrooted.
By this, I mean that there was no 'anchor' at the end nor start of the expression. For example, the following would be very slow:
.*secret.*while the following would be blazingly fast
.*secret$The reason for this is obvious in retrospect - the second regex must check six bytes at the end of an input text, while the first must check for the presence of six bytes at any location in the input text.
Conclusions
We've gone into detail on the topic of system design, outlined major pitfalls, and presented our workarounds. I hope this is useful for anyone wishing to replicate and/or extend our research! We'd love to hear about any projects you undertake inspired by (or related to) our research here.
Our system design allows us to ingest and examine files at a blazingly fast speed, scaling reasonably given multiple worker nodes. Now that we can do this, only the final peice of the puzzle remains - how to identify and extract secrets, such as passwords and keys, from the dataset. We'll talk about this in our post next week, and also also go into detail into some of our findings, such as where exactly we found credentials (sometimes in unexpected places, sometimes not) and dig deeper into the types of credentials we found, which were wide-ranging (and mildly terrifying - spoiler, yes we did search for wallet.dat, and yes we did find results). See you then!
At watchTowr, we believe continuous security testing is the future, enabling the rapid identification of holistic high-impact vulnerabilities that affect your organisation.
If you'd like to learn more about the watchTowr Platform, our Continuous Automated Red Teaming and Attack Surface Management solution, please get in touch.
The research published by watchTowr Labs is powered by the same engine behind the watchTowr Platform, our Preemptive Exposure Management solution built for enterprises that refuse to wait for the next satisfying advisory from their scanner vendor.
The watchTowr Platform combines External Attack Surface Management and Continuous Automated Red Teaming to test your defenses against the vulnerabilities and techniques that matter: the ones real attackers are actually exploiting.