
Layer Cake: How Docker Handles Filesystem Access - Docker Container Images (2/4)
This post is the second part of a series on our recent adventures in DockerHub. Before you read it, you may want to check out the other posts of this series:
- "I don't need no zero-dayz" - Docker Container Images (1/4)
- Learning To Crawl (For DockerHub Enthusiasts, Not Toddlers) (3/4)
- What Does This Key Open? - Docker Container Images (4/4)
-
Those who read the previous post, in which we speak of our bulk downloading of 32 million files spread over 22,000 Docker images, may be wondering how exactly we managed to acquire and process such a volume of data. This post will go into one vital component in this task - efficiently acquiring these files from DockerHub.
For those who have not yet read the previous instalment, a brief recap:
watchTowr has a very simple core mission - to help our clients understand how they could be compromised today. After noting how frequently we discover potential compromises caused by critical secrets lurking inside publicly-available Docker images, we decided to carry out a more thorough study to assess the scale of this kind of credential leakage. In order to do so at the kind of scale that makes it truly useful, we built a system capable of efficiently acquiring files from DockerHub, and examining the contents in order to locate and extract sensitive data, such as API keys or private certificates.
While the acquisition of these files appears to be a simple topic ("just download them from DockerHub"), this process is more complex at scale than meets the eye - requiring an understanding of Docker's internal filesystem management before it was able to perform at the kind of scale that watchTowr typically enjoys. This post explains how we managed to fetch and process such a quantity of data at scale, enabling us to draw statistically reliable conclusions from our dataset.
The naïve approach
A naïve reader might be imagining a system which would simply execute the docker pull command, which fetches a Docker image from DockerHub, in order to download images. Indeed, our prototype implementation did just this. However, we very quickly found that this simple approach was not well-suited for the acquisition of filesystem data at the scale that we intended.
Firstly, this approach rapidly exhausted disk space, as it attempted to leave each of the Docker images we processed (remember, we processed over 22,000 in total) on the systems' hard drive. We were thus forced to periodically clear out the Docker cache directory via the docker prune command, and unfortunately this led to major wastage of bandwidth and processor time.
To illustrate this wastage, consider a Docker image that is based upon Ubuntu Xenial. For example:
FROM ubuntu:xenial
RUN useradd watchtowr
Downloading this image via docker pull would result in Docker downloading both the final image itself, with the watchtowr user added, and the 'base' image containing Ubuntu Xenial. While this base layer would be cached by Docker, we would be forced to prune this cache periodically to keep disk space at a reasonable level. This means that, after clearing this cache, any subsequent fetch of an image based on Ubuntu Xenial would result in the Ubuntu Xenial image being downloaded and processed a second time. Since the Ubuntu image is large, this results in time and bandwidth waste, and since it contains many files, considerable time is wasted as we iterate and catalogue its contents. This prevents us from operating at scale.
Ingesting a Docker container would be much more efficient if we could ingest the files in the base image only once for all Ubuntu Xenial-based images, and only ingest the files which were altered by subsequent uses of this base image. Fortunately, Docker gives us the ability to do this.
Layers and their mountpoints
As you may be aware, the FROM directive in a Dockerfile instructs Docker to build a container based on a different container - for example, a build of your favourite Linux distribution, a configured webserver, or almost anything else. This is a good example of what Docker terms a "layer" - the 'base' image specified by the FROM directive is downloaded and stored, and changes made to it are stored in a separate 'delta' file. The underlying base image is not itself altered.
This concept extends past the FROM directive into the other statements in a Dockerfile. If you've used Docker in anything more than the most casual of settings, you may have noticed that your edits to the Dockerfile are usually applied quickly, without the entire container needing to be rebuilt. This is because Docker is good at keeping the output of each step cached as a 'layer' and re-using these layers to make the development process quicker.
It's easier to demonstrate this than it is to explain, so I'll take you through a simple example. We'll work from the following simple Dockerfile:
FROM ubuntu:latest
RUN useradd watchtowr
And go ahead and build it. We'll supply the argument --rm=false to explicitly keep intermediate layers, so that we can see what's going on more plainly.
$ docker build -t test --rm=false .
Sending build context to Docker daemon  2.048kB
Step 1/2 : FROM ubuntu:latest
latest: Pulling from library/ubuntu
2b55860d4c66: Pull complete
Digest: sha256:20fa2d7bb4de7723f542be5923b06c4d704370f0390e4ae9e1c833c8785644c1
Status: Downloaded newer image for ubuntu:latest
 ---> 2dc39ba059dc
Step 2/2 : RUN useradd watchtowr
 ---> Running in 4a1343b30818
 ---> 2d9c8f99458b
Successfully built 2d9c8f99458b
Successfully tagged test:latest
The hex strings represent intermediate containers and image layers. We can use the docker inspect command to find information about the newly-created container, including information about its file layers.
$ docker inspect test:latest
[
    {
        "Id": "sha256:2d9c8f99458bda0382bb8584707197cca58d6d061a28661b3decbe5f26c7a47d",
        "Parent": "sha256:2dc39ba059dcd42ade30aae30147b5692777ba9ff0779a62ad93a74de02e3e1f",
        "GraphDriver": {
            "Data": {
                "LowerDir": "/var/lib/docker/overlay2/af592f4c9c6219860c55265b4398d880b72b78a8891eabb863c29d0cf15f9d91/diff",
                "MergedDir": "/var/lib/docker/overlay2/0727186c05dce187b7c25c7f26ad929d037579d7c672e80846388436ddcb9d57/merged",
                "UpperDir": "/var/lib/docker/overlay2/0727186c05dce187b7c25c7f26ad929d037579d7c672e80846388436ddcb9d57/diff",
                "WorkDir": "/var/lib/docker/overlay2/0727186c05dce187b7c25c7f26ad929d037579d7c672e80846388436ddcb9d57/work"
            },
            "Name": "overlay2"
        }
    }
]
I've removed a lot of unimportant information from this, so we can focus on what we're really interested in, which is the mounted filesystem. Take a look at the path specified by UpperDir, and you'll see the contents of the image's filesystem:
$ find /var/lib/docker/overlay2/0727186c05dce187b7c25c7f26ad929d037579d7c672e80846388436ddcb9d57/diff -type f
/var/lib/docker/overlay2/0727186c05dce187b7c25c7f26ad929d037579d7c672e80846388436ddcb9d57/diff/etc/shadow
/var/lib/docker/overlay2/0727186c05dce187b7c25c7f26ad929d037579d7c672e80846388436ddcb9d57/diff/etc/passwd-
/var/lib/docker/overlay2/0727186c05dce187b7c25c7f26ad929d037579d7c672e80846388436ddcb9d57/diff/etc/.pwd.lock
/var/lib/docker/overlay2/0727186c05dce187b7c25c7f26ad929d037579d7c672e80846388436ddcb9d57/diff/etc/gshadow-
/var/lib/docker/overlay2/0727186c05dce187b7c25c7f26ad929d037579d7c672e80846388436ddcb9d57/diff/etc/subuid
/var/lib/docker/overlay2/0727186c05dce187b7c25c7f26ad929d037579d7c672e80846388436ddcb9d57/diff/etc/group-
/var/lib/docker/overlay2/0727186c05dce187b7c25c7f26ad929d037579d7c672e80846388436ddcb9d57/diff/etc/gshadow
/var/lib/docker/overlay2/0727186c05dce187b7c25c7f26ad929d037579d7c672e80846388436ddcb9d57/diff/etc/shadow-
/var/lib/docker/overlay2/0727186c05dce187b7c25c7f26ad929d037579d7c672e80846388436ddcb9d57/diff/etc/subgid-
/var/lib/docker/overlay2/0727186c05dce187b7c25c7f26ad929d037579d7c672e80846388436ddcb9d57/diff/etc/passwd
/var/lib/docker/overlay2/0727186c05dce187b7c25c7f26ad929d037579d7c672e80846388436ddcb9d57/diff/etc/group
/var/lib/docker/overlay2/0727186c05dce187b7c25c7f26ad929d037579d7c672e80846388436ddcb9d57/diff/etc/subgid
/var/lib/docker/overlay2/0727186c05dce187b7c25c7f26ad929d037579d7c672e80846388436ddcb9d57/diff/etc/subuid-
/var/lib/docker/overlay2/0727186c05dce187b7c25c7f26ad929d037579d7c672e80846388436ddcb9d57/diff/var/log/lastlog
/var/lib/docker/overlay2/0727186c05dce187b7c25c7f26ad929d037579d7c672e80846388436ddcb9d57/diff/var/log/faillog
Here we can see all the changes made by the final command in the Dockerfile - in our case, a useradd watchtowr command, which can be audited, examined, or logged independently of other commands or the base filesystem image.
While this may seem like an interesting but mostly-useless implementation detail, it is actually very useful to us in our quest to efficiently archive a large amount of containers. This is the mechanism that allows us to process each layer individually, allowing us to re-use the result of previous examinations. Given two unrelated containers that rely on, for example, an Ubuntu base system, we can ingest the Ubuntu base only once, and ingest the changes made by each other two containers in isolation.
DockerHub and pulling images
Given our newfound knowledge of Docker layers, it is our next task to determine how to acquire these layers in isolation. Typically, if a user wishes to use an image located on DockerHub, they will either pull it explicitly using the docker pull command or simply specify it in their Dockerfile using the FROM statement. Let's look more closely, and examine the Ubuntu xenial image. If we pay attention to a 'pull' of the image via the docker pull command, we can see that four layers are fetched:
$ docker pull ubuntu:xenial
xenial: Pulling from library/ubuntu
58690f9b18fc: Pull complete
b51569e7c507: Pull complete
da8ef40b9eca: Pull complete
fb15d46c38dc: Pull complete
Digest: sha256:91bd29a464fdabfcf44e29e1f2a5f213c6dfa750b6290e40dd6998ac79da3c41
Status: Downloaded newer image for ubuntu:xenial
docker.io/library/ubuntu:xenial
We can interrogate Docker to find information about the underlying layers using docker inspect, but we can also query the DockerHub server directly. We'll take the latter approach for our demonstration, as it will enable us to fetch layers ourselves without needing to call the docker command at all.
Our first step, given our repository name, repository owner, and, tag name, is to fetch the manifest from the registry. This is a JSON file which stores metadata about the image, such as its name, architecture, and (importantly for us) filesystem layers.
It's our experience that the DockerHub API can be quite exacting in its requirements, presumably due to some backward compatibility issues with previous clients. If you're following along, be sure to specify the specified HTTP headers when requesting, otherwise you may get unexpected results.
In order to fetch the manifest, the DockerHub API first requires that we log in (anonymously). We'll do that with curl, which should give us an access token. Note that we must specify the repository owner and name when obtaining a session:
$ curl  "https://auth.docker.io/token?service=registry.docker.io&scope=repository:library/ubuntu:pull"
{"token":"eyJhbGci<snip>gDHzIqA","access_token":"eyJhbGci<snip>gDHzIqA","expires_in":300,"issued_at":"2022-09-22T14:08:55.923752639Z"}
We're interested in the value of the 'token' field, since that's what we need to present to the DockerHub API. With this, we can fetch the manifest for the repo we're after:
$ curl --header "Authorization: Bearer eyJhbGci<snip>gDHzIqA" "https://registry-1.docker.io/v2/library/ubuntu/manifests/xenial"{
"schemaVersion": 1,
"name": "library/ubuntu",
"tag": "xenial",
"architecture": "amd64",
"fsLayers": [
{
"blobSum": "sha256:a3ed95caeb02ffe68cdd9fd84406680ae93d633cb16422d00e8a7c22955b46d4"
},
{
"blobSum": "sha256:fb15d46c38dcd1ea0b1990006c3366ecd10c79d374f341687eb2cb23a2c8672e"
},
{
"blobSum": "sha256:da8ef40b9ecabc2679fe2419957220c0272a965c5cf7e0269fa1aeeb8c56f2e1"
},
{
"blobSum": "sha256:b51569e7c50720acf6860327847fe342a1afbe148d24c529fb81df105e3eed01"
},
{
"blobSum": "sha256:58690f9b18fca6469a14da4e212c96849469f9b1be6661d2342a4bf01774aa50"
}
]
<snip>
}
Great, so we find that the image is built from five layers, and we have the hash of each! We can fetch the images themselves straight from the DockerHub API (it'll give us a HTTP redirect, so make sure you specify --location to follow it):
$ curl --location --header "Authorization: Bearer eyJhbGci<snip>gDHzIqA"
https://registry-1.docker.io/v2/library/ubuntu/blobs/sha256:fb15d46c38dcd1ea0b1990006c3366ecd10c79d374f341687eb2cb23a2c8672e -o layer
The file we've fetched is a simple gzip'ed tarfile.
$ file layer
layer: gzip compressed data, truncated
$ tar -zvxf layer
drwxr-xr-x 0/0               0 2021-08-05 03:01 run/
drwxr-xr-x 0/0               0 2021-08-31 09:21 run/systemd/
-rw-r--r-- 0/0               7 2021-08-31 09:21 run/systemd/container
Neat. The other layers contain the bulk of the filesystem entries:
$ curl --location --header "Authorization: Bearer eyJhbGci<snip>gDHzIqA"
https://registry-1.docker.io/v2/library/ubuntu/blobs/sha256:58690f9b18fca6469a14da4e212c96849469f9b1be6661d2342a4bf01774aa50 -o layer
  % Total    % Received % Xferd  Average Speed   Time    Time     Time  Current
                                 Dload  Upload   Total   Spent    Left  Speed
  0     0    0     0    0     0      0      0 --:--:--  0:00:01 --:--:--     0
100 44.3M  100 44.3M    0     0  22.3M      0  0:00:01  0:00:01 --:--:-- 62.6M
$ tar -zvtf layer |head
drwxr-xr-x 0/0               0 2021-08-05 03:01 bin/
-rwxr-xr-x 0/0         1037528 2019-07-13 03:26 bin/bash
-rwxr-xr-x 0/0           52080 2017-03-03 02:07 bin/cat
-rwxr-xr-x 0/0           60272 2017-03-03 02:07 bin/chgrp
-rwxr-xr-x 0/0           56112 2017-03-03 02:07 bin/chmod
-rwxr-xr-x 0/0           64368 2017-03-03 02:07 bin/chown
-rwxr-xr-x 0/0          151024 2017-03-03 02:07 bin/cp
-rwxr-xr-x 0/0          154072 2016-02-18 04:25 bin/dash
-rwxr-xr-x 0/0           68464 2017-03-03 02:07 bin/date
-rwxr-xr-x 0/0           72632 2017-03-03 02:07 bin/dd
If we browse with a web browser to view the Dockerfile that was used to create the image, we can correlate the steps - we notice that the final command in the Dockerfile is /bin/sh -c mkdir -p /run/systemd, which corresponds to the first layer we pulled down.
GZBombing
If I may take a brief step away from our larger objective here and explore something of a tangent, our research made us rather curious about the scope for abusing DockerHub for nefarious purposes. Specifically, the architecture of this system itself - a large 'blob store' - piqued my interest.
One of my first considerations was, "is it possible to upload a 'GZip bomb' - a file which decompresses to an impractically large output - to DockerHub"? This would have little real-world impact beyond creating a repository which was effectively "un-pull-able", but is an interesting curiosity nontheless.
Since gzip's maximum compression ratio is 1032:1 (see here), we will start off by compressing 1TB of zeros, producing a file roughly 1GB in size.
$ dd if=/dev/zero bs=1024 count=$((1024*1024*1024)) status=progress | gzip > tmp.gzDocker, of course, won't let us push such large objects, and so we are forced to perform the upload process itself. We must, then, upload this file to DockerHub, and finally, create a manifest which references it as if it were a filesystem layer, so that it will be downloaded by the client when an image is pulled via the usual docker pull.
Uploading a file to DockerHub's "blob store" is straightforward, although not a single-step process. First, we must authenticate (this time with a real account on DockerHub.com). Note the access we supply is, this time, push,pull rather than pull as before. Here, I'm authenticating as my account, alizwatchtowr, and preparing to push to the foo repository.
$ curl -u alizwatchtowr:<my password> "https://auth.docker.io/token?account=alizwatchtowr&service=registry.docker.io&scope=repository:library/ubuntu:push,pull"
{"token":"..", ...}
We get a token as before. Our next step is to do a POST of length zero to the /v2/alizwatchtowr/foo/blobs/uploads/ endpoint, which will elicit a response containing a redirect via the location header. I'm going to switch to showing the raw HTTP request and response data here, rather than cURL commands.
POST /v2/alizwatchtowr/foo/blobs/uploads/ HTTP/1.1
Host: registry-1.docker.io
Content-Length: 0
Authorization: Bearer <token>
As expected, our response contains a location header.
HTTP/1.1 202 Accepted
content-length: 0
docker-distribution-api-version: registry/2.0
docker-upload-uuid: d907ce6b-c800-47a8-b7f3-c13147acd9a6
location: https://registry-1.docker.io/v2/alizwatchtowr/foo/blobs/uploads/d907ce6b-c800-47a8-b7f3-c13147acd9a6?_state=7hAcy4hFGe8sGNMae3jr9RIIuUD77OtskTElHOgT4Y57Ik5hbWUiOiJhbGl6d2F0Y2h0b3dyL2ZvbyIsIlVVSUQiOiJkOTA3Y2U2Yi1jODAwLTQ3YTgtYjdmMy1jMTMxNDdhY2Q5YTYiLCJPZmZzZXQiOjAsIlN0YXJ0ZWRBdCI6IjIwMjItMDktMjVUMTc6NTE6MTYuOTg3NDkzNzc5WiJ9
range: 0-0
date: Sun, 25 Sep 2022 17:51:17 GMT
strict-transport-security: max-age=31536000
connection: close
We must then issue a HTTP PATCH verb to the location specified by this header, with our data as the payload.
PATCH /v2/alizwatchtowr/foo/blobs/uploads/d907ce6b-c800-47a8-b7f3-c13147acd9a6?_state=7hAcy4hFGe8sGNMae3jr9RIIuUD77OtskTElHOgT4Y57Ik5hbWUiOiJhbGl6d2F0Y2h0b3dyL2ZvbyIsIlVVSUQiOiJkOTA3Y2U2Yi1jODAwLTQ3YTgtYjdmMy1jMTMxNDdhY2Q5YTYiLCJPZmZzZXQiOjAsIlN0YXJ0ZWRBdCI6IjIwMjItMDktMjVUMTc6NTE6MTYuOTg3NDkzNzc5WiJ9 HTTP/1.1
Host: registry-1.docker.io
Authorization: Bearer <token>
Content-Length: <size of tmp.gz>

<raw data from tmp.gz>
The server response with a HTTP 202 Accepted, but our work is not yet over.
HTTP/1.1 202 Accepted
content-length: 0
docker-distribution-api-version: registry/2.0
docker-upload-uuid: d907ce6b-c800-47a8-b7f3-c13147acd9a6
location: https://registry-1.docker.io/v2/alizwatchtowr/foo/blobs/uploads/d907ce6b-c800-47a8-b7f3-c13147acd9a6?_state=KhwcMVoX_Mtz8IeXtz2NCwSQoIeolZhFoD7-vZK6iYx7Ik5hbWUiOiJhbGl6d2F0Y2h0b3dyL2ZvbyIsIlVVSUQiOiJkOTA3Y2U2Yi1jODAwLTQ3YTgtYjdmMy1jMTMxNDdhY2Q5YTYiLCJPZmZzZXQiOjE4MjUsIlN0YXJ0ZWRBdCI6IjIwMjItMDktMjVUMTc6NTE6MTZaIn0%3D
range: 0-<size of tmp.gz>
date: Sun, 25 Sep 2022 17:51:22 GMT
strict-transport-security: max-age=31536000
connection: close
We must also perform an HTTP PUT to the URL in the location header, specifying the hash that we expect. We calculate the hash first:
$ pv tmp.gz |sha256sum
1017MiB 0:00:04 [ 227MiB/s] [================================>] 100%
9358dad6bc6da9103d5c127dc2e88cbcf3dd855d8a48e3e7b7e1de282f87a27f  -
Now we append this to the location, as an extra query string parameter named 'digest'. It is in the usual Docker format, hex bytes prefixed with the literal string sha256:.
PUT /v2/alizwatchtowr/foo/blobs/uploads/d907ce6b-c800-47a8-b7f3-c13147acd9a6?_state=KhwcMVoX_Mtz8IeXtz2NCwSQoIeolZhFoD7-vZK6iYx7Ik5hbWUiOiJhbGl6d2F0Y2h0b3dyL2ZvbyIsIlVVSUQiOiJkOTA3Y2U2Yi1jODAwLTQ3YTgtYjdmMy1jMTMxNDdhY2Q5YTYiLCJPZmZzZXQiOjE4MjUsIlN0YXJ0ZWRBdCI6IjIwMjItMDktMjVUMTc6NTE6MTZaIn0%3D&digest=sha256%3A9358dad6bc6da9103d5c127dc2e88cbcf3dd855d8a48e3e7b7e1de282f87a27f HTTP/1.1
Host: registry-1.docker.io
Content-Length: 0
Authorization: Bearer <token>
Finally, we see a HTTP 201 Created, and our work is done:
HTTP/1.1 201 Created
content-length: 0
docker-content-digest: sha256:1be66495afef80008912c98adc4db8bb6816376f8da430fae68779e0459566a2
docker-distribution-api-version: registry/2.0
location: https://registry-1.docker.io/v2/alizwatchtowr/foo/blobs/sha256:9358dad6bc6da9103d5c127dc2e88cbcf3dd855d8a48e3e7b7e1de282f87a27f
date: Sun, 25 Sep 2022 17:51:29 GMT
strict-transport-security: max-age=31536000
connection: close
We can verify that the resource has indeed been created by fetching it, although we must log in first. This is easily done via cURL:
$ curl  "https://auth.docker.io/token?service=registry.docker.io&scope=repository:alizwatchtowr/foo:pull"
{"token":"..", ...}
$ curl --location --header "Authorization: Bearer eyJhbGci<snip>gDHzIqA" https://registry-1.docker.io/v2/alizwatchtowr/foo/blobs/sha256:9358dad6bc6da9103d5c127dc2e88cbcf3dd855d8a48e3e7b7e1de282f87a27f -o uploaded.gz
At this stage, however, there is no DockerHub repository which references the file. In order to reference the file, we must modify the manifest of a tag to specify our new file by hash. This is easiest if we work from an existing repository, so I built a simple 'hello world' style repository, built it, and issued a docker inspect command to view its manifest. As you may recall from above, this manifest lists (among other things) the hash of filesystem images. We will simply alter this, changing one to the sha256 hash of the image we uploaded previously.
"diff_ids":[
    "sha256:7f5cbd8cc787c8d628630756bcc7240e6c96b876c2882e6fc980a8b60cdfa274",
    "sha256:9358dad6bc6da9103d5c127dc2e88cbcf3dd855d8a48e3e7b7e1de282f87a27f"
]
Note the final layer's hash.
We can upload this file to the 'blob store' as before, which yields the hash of the manifest itself (in our case, fee9926cf943231119d363b65042138890ca9ad6299a75e6061aa97dade398d0). But DockerHub still won't recognise it as a manifest - we must perform one final step, which is a simple PUT to /v2/alizwatchtowr/foo/manifests/latest. This request uploads a manifest list, which specifies the hash of the manifest itself. It looks like this:
{
   "schemaVersion": 2,
   "mediaType": "application/vnd.docker.distribution.manifest.v2+json",
   "config": {
      "mediaType": "application/vnd.docker.container.image.v1+json",
      "size": 1619,
      "digest": "sha256:1834ec0829375e72a44940b8f084cd02991736281d012396e1dc32ce9ea36e8d"
   },
   "layers": [
      {
         "mediaType": "application/vnd.docker.image.rootfs.diff.tar.gzip",
         "size": 30426706,
         "digest": "sha256:2b55860d4c667a7200a0cb279aec26777df61e5d3530388f223ce7859d566e7a"
      },
      {
         "mediaType": "application/vnd.docker.image.rootfs.diff.tar.gzip",
         "size": 1825,
         "digest": "sha256:1be66495afef80008912c98adc4db8bb6816376f8da430fae68779e0459566a2"
      }
   ]
}
We change the first digest to that of our manifest, and send it via an HTTP PUT.
{
   "schemaVersion": 2,
   "mediaType": "application/vnd.docker.distribution.manifest.v2+json",
   "config": {
      "mediaType": "application/vnd.docker.container.image.v1+json",
      "size": 1619,
      "digest": "sha256:fee9926cf943231119d363b65042138890ca9ad6299a75e6061aa97dade398d0"
   },
   "layers": [
      {
         "mediaType": "application/vnd.docker.image.rootfs.diff.tar.gzip",
         "size": 30426706,
         "digest": "sha256:2b55860d4c667a7200a0cb279aec26777df61e5d3530388f223ce7859d566e7a"
      },
      {
         "mediaType": "application/vnd.docker.image.rootfs.diff.tar.gzip",
         "size": 1825,
         "digest": "sha256:1be66495afef80008912c98adc4db8bb6816376f8da430fae68779e0459566a2"
      }
   ]
}
Finally, our image is uploaded to DockerHub! Browsing to it shows the hash of the manifest list, and nothing seems to be awry:
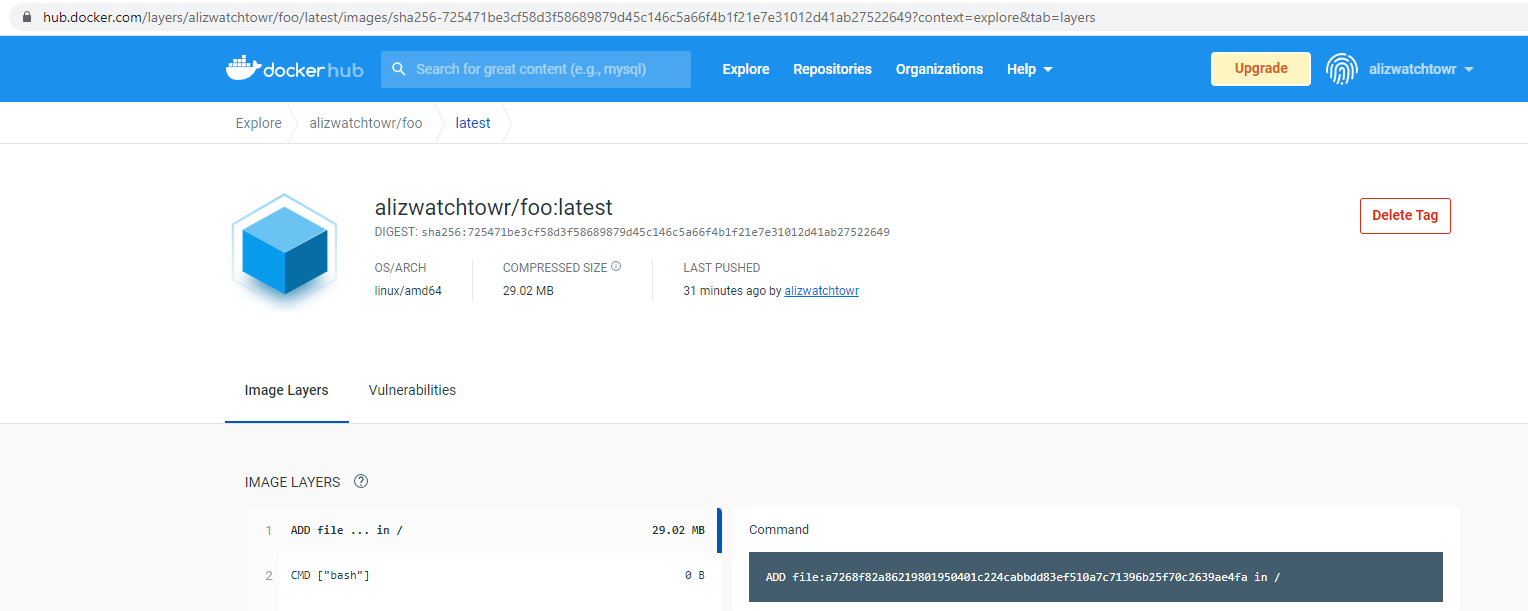
But when we try to pull it, we are met with unusably slow decompression of 1TB of data. We have successfully pushed an object so large it cannot be pulled.

We could, if this was not enough, add more layers or add even larger payload data.
Since the API requires that we authenticate, the scope for HTTP-based shenanigans such as XSS reduced to almost zero. Storing arbitrary objects in an object blob store itself can hardly be called a vulnerability (although it may be useful to some attackers).
Bringing it all together
In this post, we've scrutinised Docker's concept of layered filesystems, learning how we can enumerate the layers associated with an image, and how to fetch them individually from DockerHub, without their dependencies. Given our new understanding, it is now possible for us to write an efficient file indexer for Docker images, fetching only layers we have not yet indexed, and ingesting only files we have not encountered before. This ability enables us to ingest the files contained within a Docker image without needing to shell out to the docker command at all.
While this comprehension may seem academic at first glance, it is actually a crucial part of the system we are designing in this series. As mentioned above, initial prototyping of this system would fetch containers simply by repeatedly executing docker pull, which would pull all of the layers referenced by the given container. Since these would be written to disk, a periodic prune was necessary to remove them. However, this often meant that base layers were fetched repeatedly, leading to unacceptably poor performance and network load - preventing us from processing data at the scale we aspire to.
This new approach, however, enables us to process Docker layers individually, building up our view of containers in a much more structured way, with no duplication. With the significant boost in efficiency that this brings, we are able to fetch substantially more files from DockerHub, and thus build up a much more realistic view of the broader container landscape, ultimately resulting in more statistically reliable output.
We also took a brief jaunt into the file upload process, figuring out how to upload filesystem layers to DockerHub, and how to modify manifests, culminating in a gzip bomb, which (while useless) is an interesting curiosity. One wonders how effective a C2 network built upon DockerHub objects would be, since very few organisations would scrutinize this traffic.
Next week, we'll put our newfound knowledge about Docker's layered filesystem into practical use, discussing how we built a system capable of archiving, indexing, and examining such a large quantity of data for those all-important secrets. We'll outline general design and then delve into detail on specific topics, outlining difficulties we faced and sharing performance statistics. I hope you'll join us!
Examining this kind of 'hidden' attack surface is exactly what we do here at watchTowr. We believe continuous security testing is the future, enabling the rapid identification of holistic high-impact vulnerabilities that affect your organisation
If you'd like to learn more about the watchTowr Platform, our Continuous Automated Red Teaming and Attack Surface Management solution, please get in touch.
The research published by watchTowr Labs is powered by the same engine behind the watchTowr Platform, our Preemptive Exposure Management solution built for enterprises that refuse to wait for the next satisfying advisory from their scanner vendor.
The watchTowr Platform combines External Attack Surface Management and Continuous Automated Red Teaming to test your defenses against the vulnerabilities and techniques that matter: the ones real attackers are actually exploiting.